At a glance: MOLOCO, an AppsFlyer integrated partner, turns user data into ad performance, enabling mobile businesses to execute marketing and advertising monetization programs.
![]()
Setting up MOLOCO
Prerequisite: Before setting up the integration, make sure you contact the partner and open an account with them.
To activate or edit the integration:
-
To activate: In AppsFlyer, from the side menu, select Collaborate > Partner Marketplace.
To edit: In AppsFlyer, from the side menu, select Collaborate > Active Integrations. - Search for the partner and select it.
- Click Set up integration. You’re directed to the integration setup page.
- In the Integration tab, select the app for the integration and turn Activate partner on.
Note: The toggle must be on (activated) for as long as you work with the partner. - Complete the configuration using the relevant tabs, as described below.
MOLOCO's configuration window includes 3 active tabs: Integration, Attribution link, and Permissions. Click on the items below to read about the tabs setup.
For a detailed description of the Partner Configuration Window Header, click here.
Tip
- The General Settings step in the Integration tab is mandatory for all partners
- All the rest of the steps are either descriptive or optional
Integration tab
The Integration Tab is divided into different sections as described below.
Activate partner
On the first visit here, you will need to toggle ON the Activate Partner button to enable setup of the Integration tab parameters. The toggle MUST be ON for as long as you work with the partner.
For more details about partner activation, please click here.
Note
As an all-install network, MOLOCO prefers to receive postbacks for all new installs of your app from any source, including organic. To do so, select Events attributed to any partner to send all install postbacks to MOLOCO.
General settings
Enable View-Through attribution
Toggle this to ON if you want to attribute view-through installs from MOLOCO. The view-through lookback slider is available on the attribution link tab (described below).
Default postbacks
Send automatic postbacks to MOLOCO following user installs and re-engagements. Use this section to define the source of the users that allow sending these postbacks.
Select Only events attributed to this partner for events coming only from users attributed to MOLOCO.
Select Events attributed to any partner or organic to have your entire user base available to be reported to MOLOCO.
In-app events settings
In this section you can map your AppsFlyer events with MOLOCO via postbacks.
- Toggle In-App Event Postbacks to ON.
- Select the Sending Option for all SDK-defined events.
- Only events attributed to this partner for events coming only from users attributed to this partner
- Events attributed to any partner or organic to have your entire user base available to be reported to the partner - Click Add Event to add an SDK Event to the list.
- Complete the following parameters:
| Parameter Name | Description |
|---|---|
| AppsFlyer event |
The name of the event, as received by AppsFlyer either from the SDK integrated into your app or from server-to-server events.
|
| mapped to partner event |
The unique name or ID of each event, as defined on the partner's side. Possible mapping configurations are:
|
| for users from |
Select the sending option for the event:
|
| including |
|
Note
You can send ad revenue postbacks to MOLOCO using theaf_ad_revenue event so they can optimize campaigns.
Attribution link tab
Generate and save attribution links and send them to the partner for attributing specific campaigns, ad sets, or single ads - both for UA and retargeting campaigns. You can use either a single-platform link or a OneLink.
Learn more about attribution link structure and parameters.
To generate an attribution link, follow these instructions.
Cost tab
AppsFlyer gets cost details by API. See the ad network cost integration table for full details on the supported dimensions, metrics, and features. Note: Cost data requires an ROI360 subscription.
To enable the cost API:
- Follow these integration instructions.
View your cost API status and the last time AppsFlyer managed to pull matching cost data in either the cost (and ad revenue) integration status dashboard, or in the individual ad network dashboard.
Ad revenue tab
Ad Revenue integration is not available for this partner.
Permissions tab
In this tab, you can select the permissions to grant MOLOCO, whether the partner acts as an ad network, agency, or both. Note that even if attribution is disabled for MOLOCO, the permissions tab is active and you can grant control to MOLOCO.
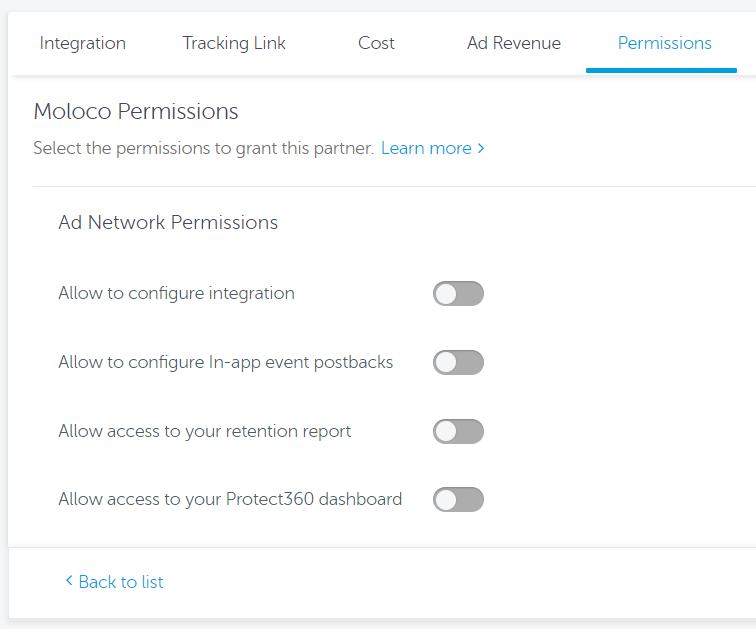 Ad Network Permissions
Use these toggles to give the ad network permissions to handle its own configuration for your app:
- Allow to configure integration - permit the partner to set up the integration tab (except in-app event postbacks)
- Allow to configure in-app event postbacks - permit the partner to setup in-app event postbacks mapping to itself on the Integration tab
- Allow access to your retention report - only to the partner's own retention data
- Allow access to your Protect360 dashboard - only to the partner's own Protect360 data, and providing the feature is enabled for the advertiser
Learn more about granting ad network permissions.